Beginners

Easter wreath making

We are stuck at home this Easter with covid and I need something to lift my mood…this is my answer!

What do you need

-a willow ring (I got my from my local florist for £8) or make one with some bendy twigs like fresh willow

-florist wire

-wire cutters

-secetares (or if not old scissors )

-foliage I got some bits of blossom and rosemary from the garden and used shop brought carnations and gypsophila

-string

-moss (I scraped mine of my moss lawn 🤣)

-water sprayer

If you don’t have any of these bits don’t let it stop you!

Think creatively if you don’t have a willow wreath you could use a redundant christmas wreath from last year and give it a good soak, or you could forage some bendy twigs and make a rustic style ring.
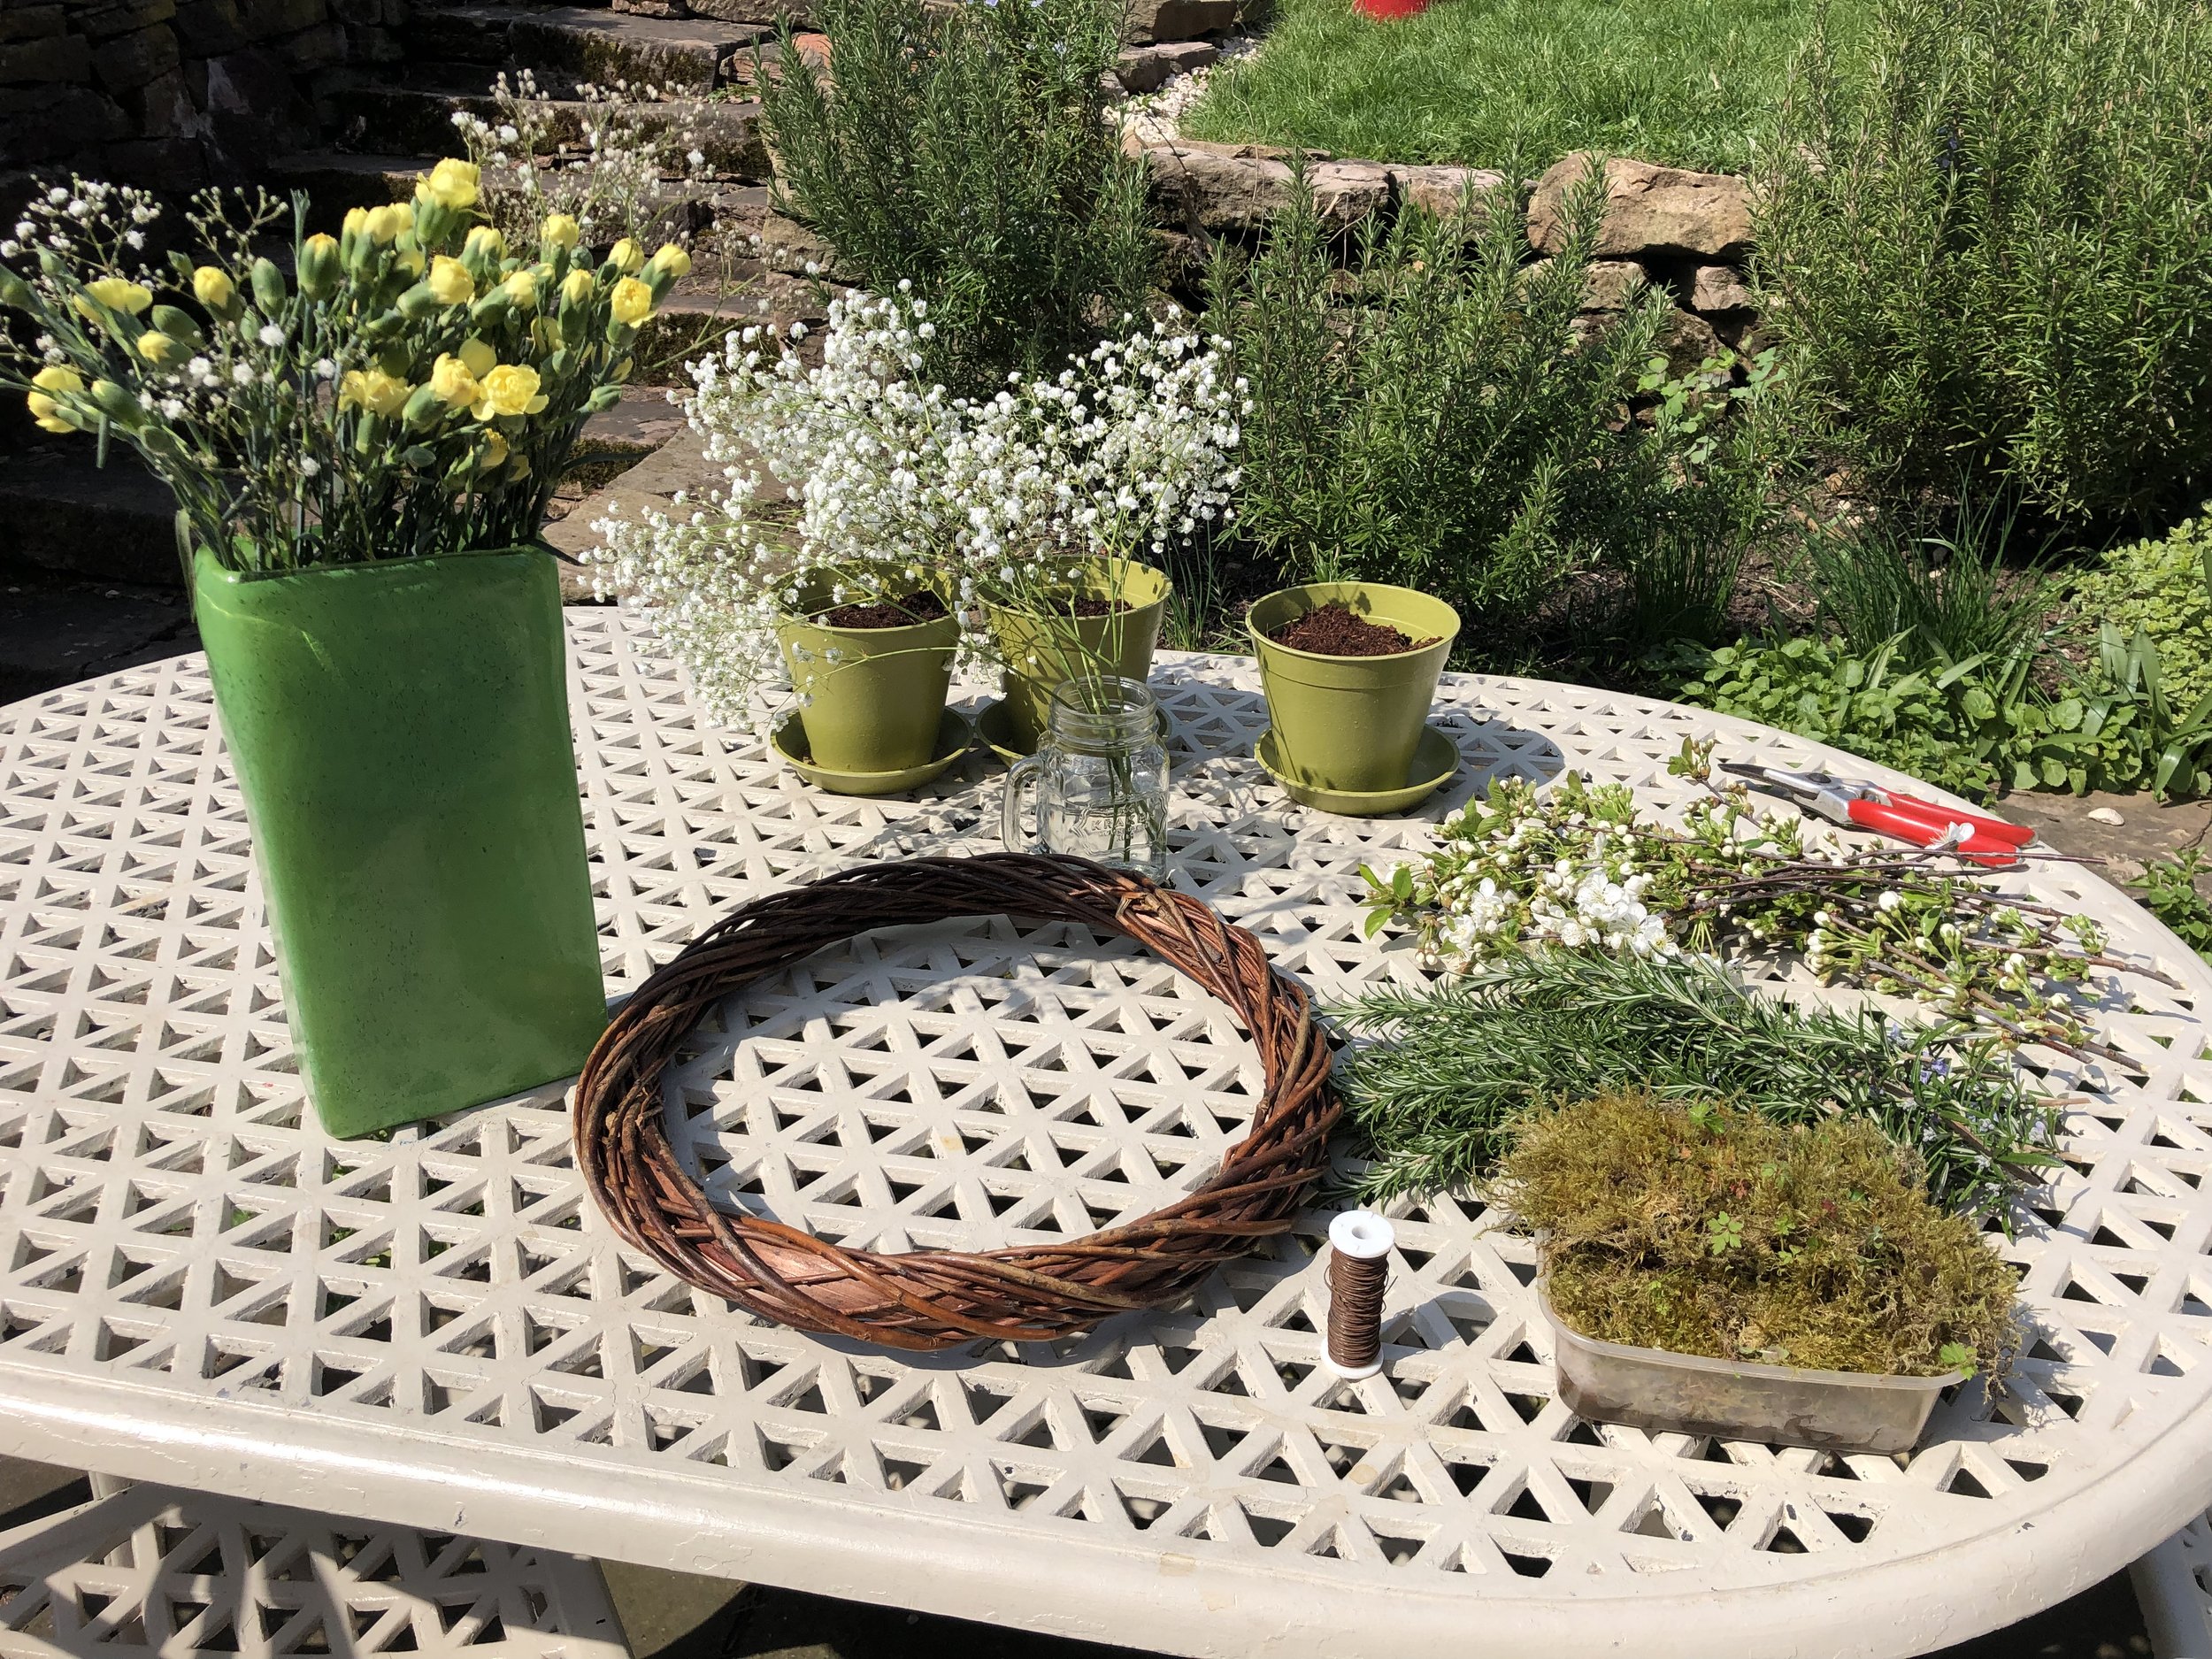

Let’s begin…

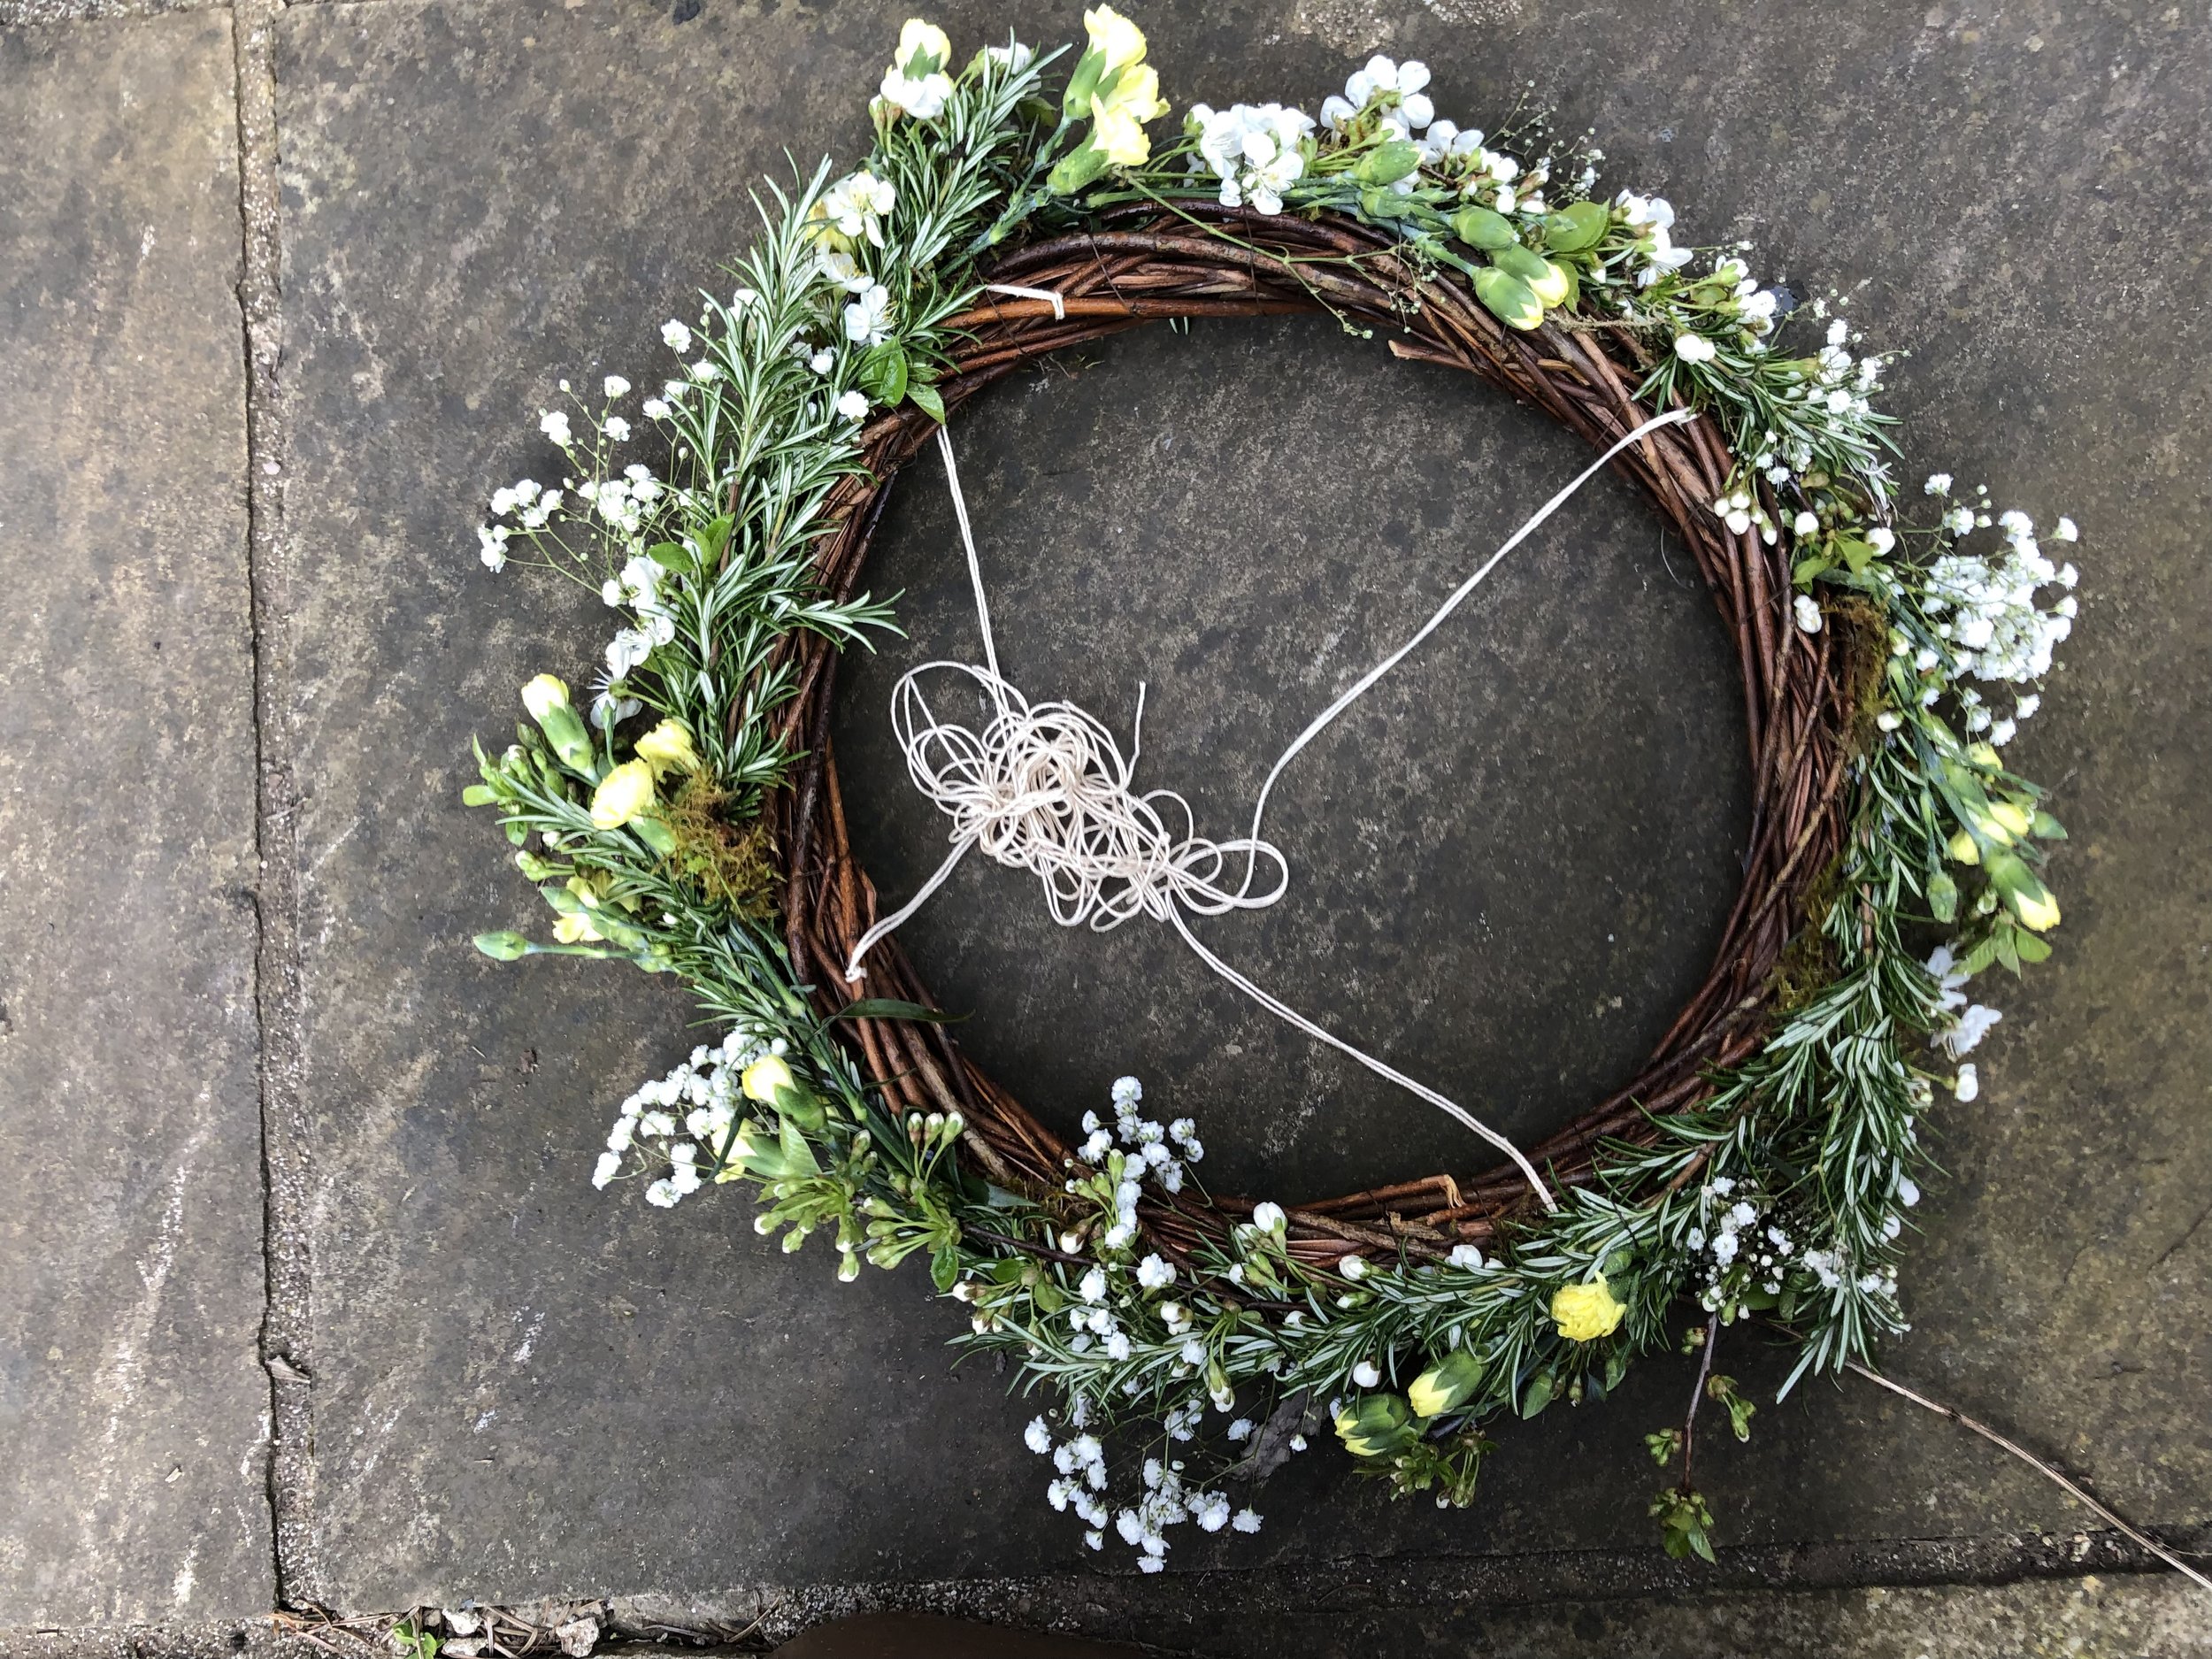
First I tied 4 pieces of strong string to each quarter of the wreath. The string was about 3mt long and a doubled it up to make it 1.5mt and stronger.

Eventually I will tie these four strands together and use that knot to tie to the hook in my ceiling.


For arranging the foliage I used a method similar to my christmas wreath making which your can click to watch on IGTV.

Except I didn’t wrap my wreath with moss I just tied a little bit of moss around the base of each bunch of stems. I’m keen to make this wreath last the whole weekend so using pre soaked moss and spraying it daily hopefully it will!


Sorry awkward photo! But your can see to economise I just arranged foliage around the side of the wreath. I didn’t wrap the foliage around both sides of the wreath like you would a door wreath as this wreath is being hung you won’t see it from the top.


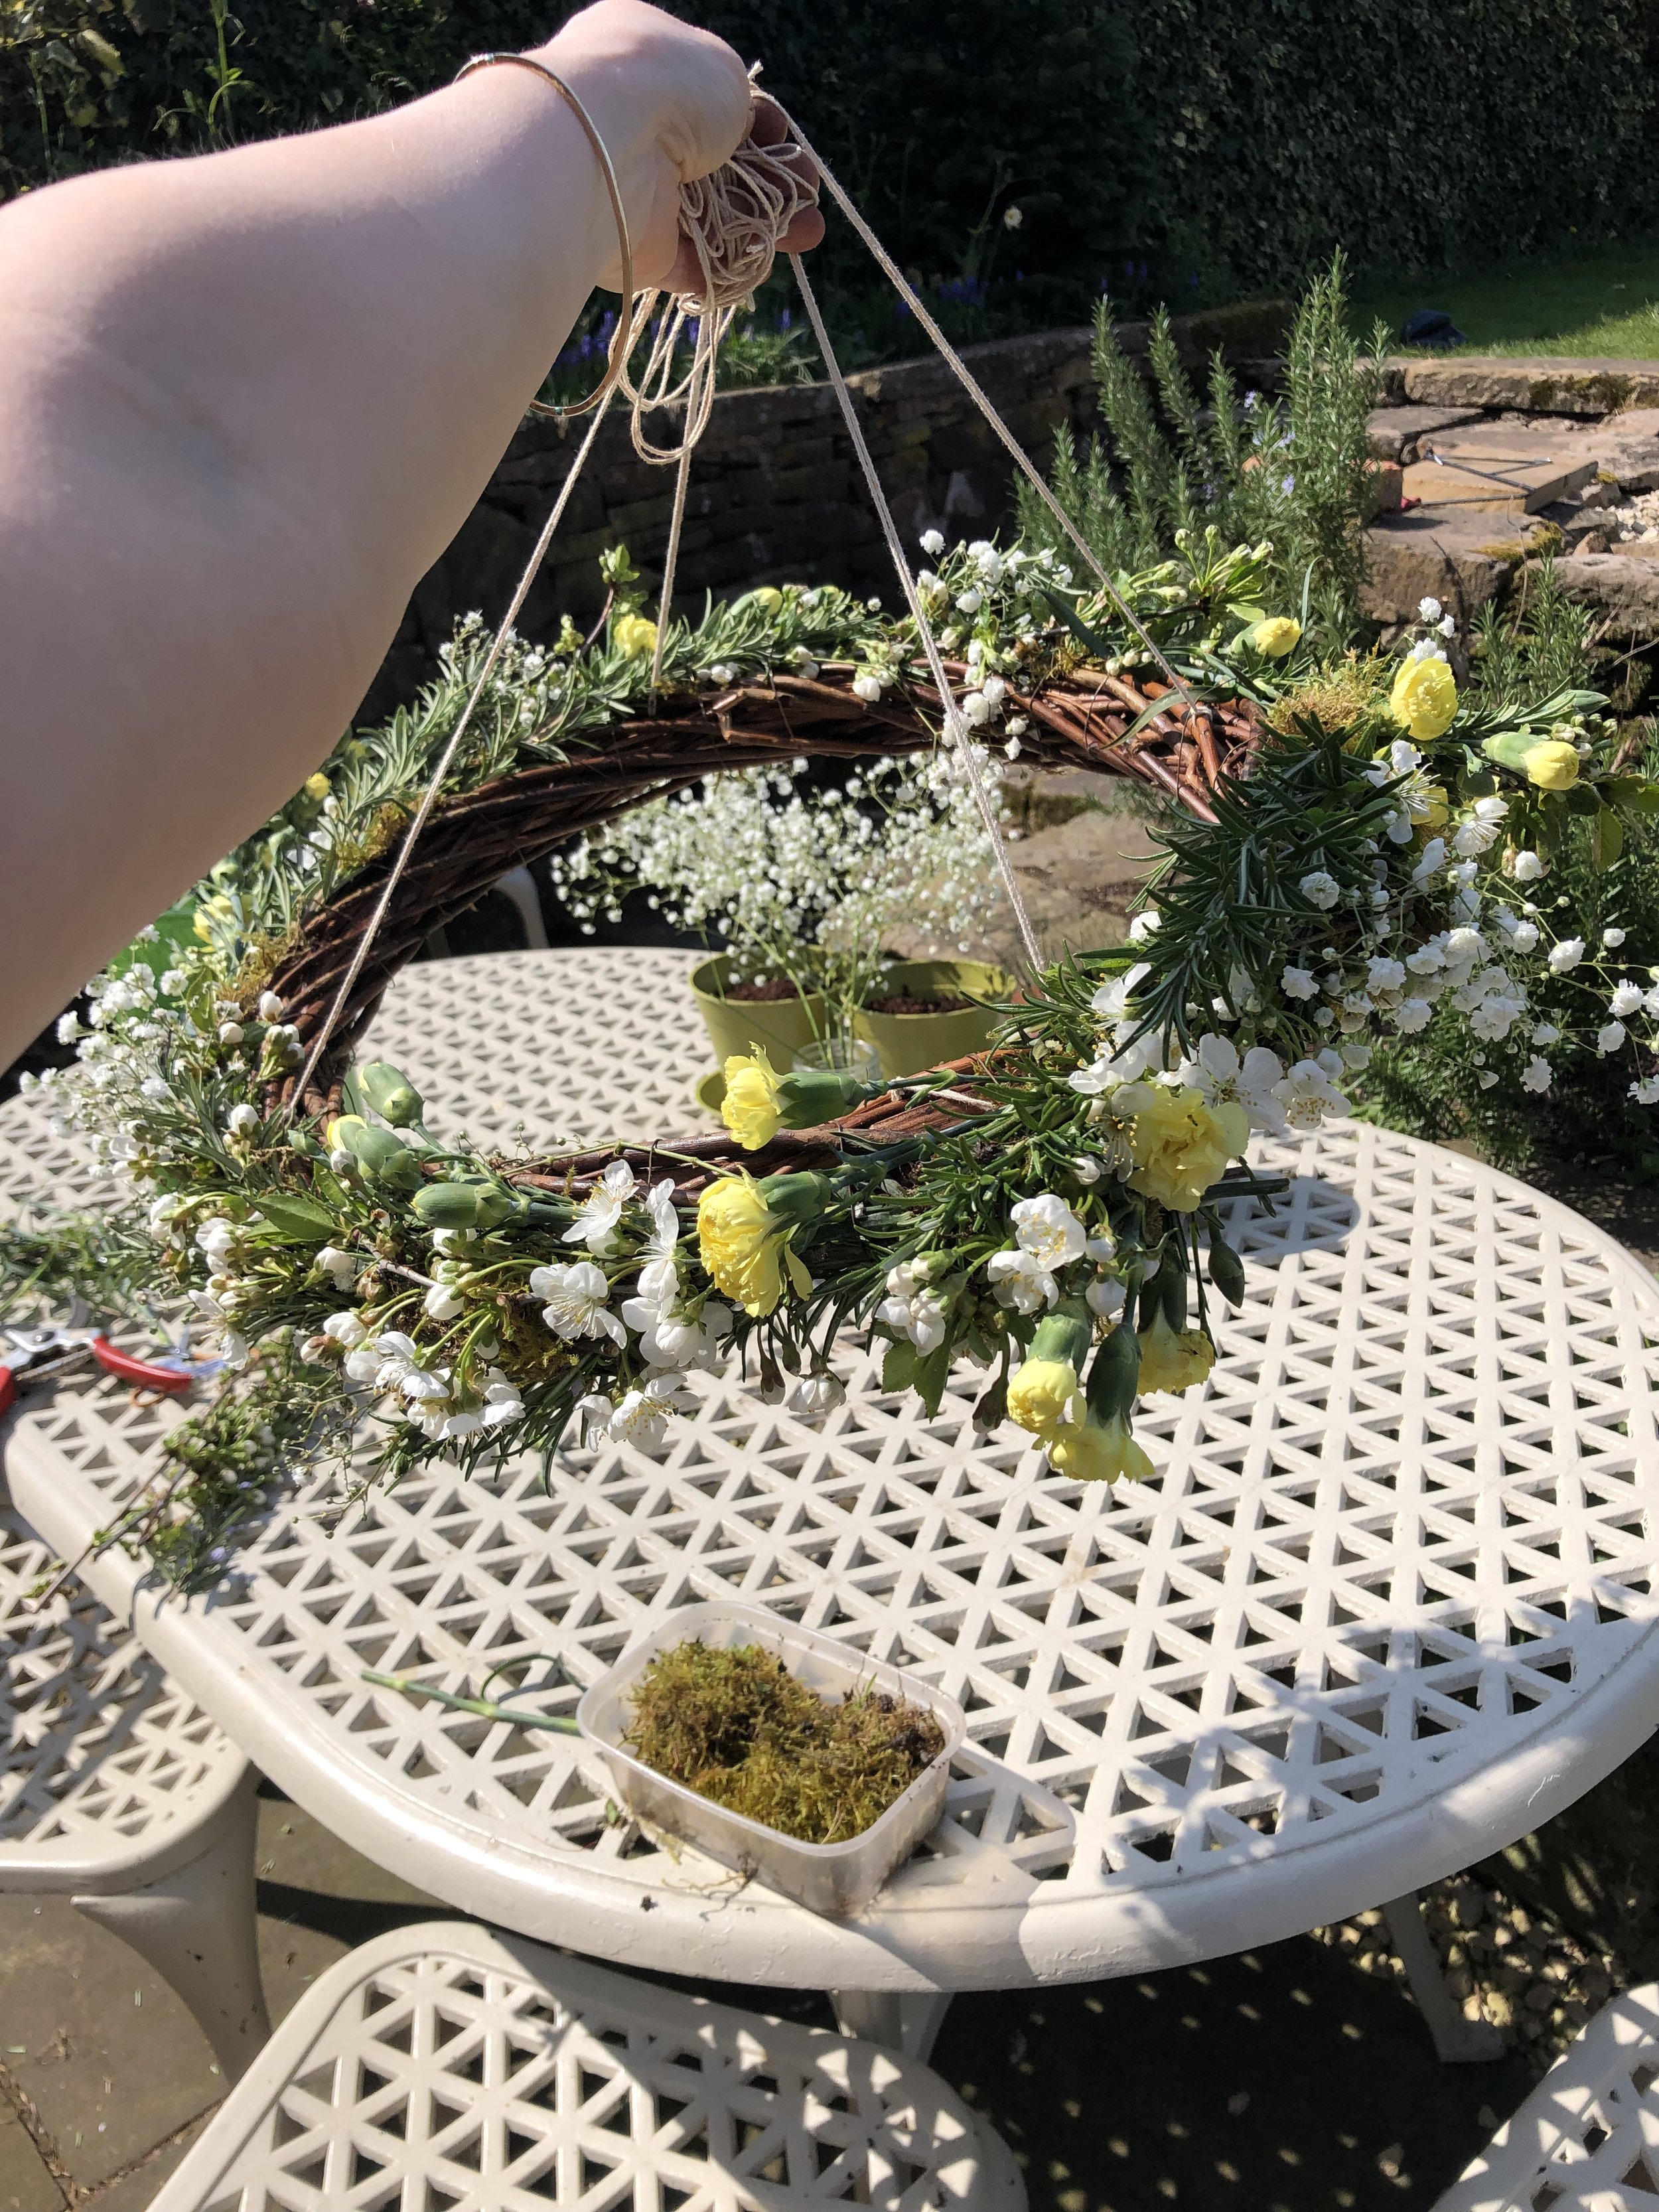
Next I suspend my wreath temporarily so I can add all the flowers that suspend from the wreath.

I have chosen flowers and foliage that won’t wilt as the pieces hanging down don’t have damp moss around them. I went for gypsophila and carnations as they can handle get slightly dry unlike blossom which would wilt and look unattractive.

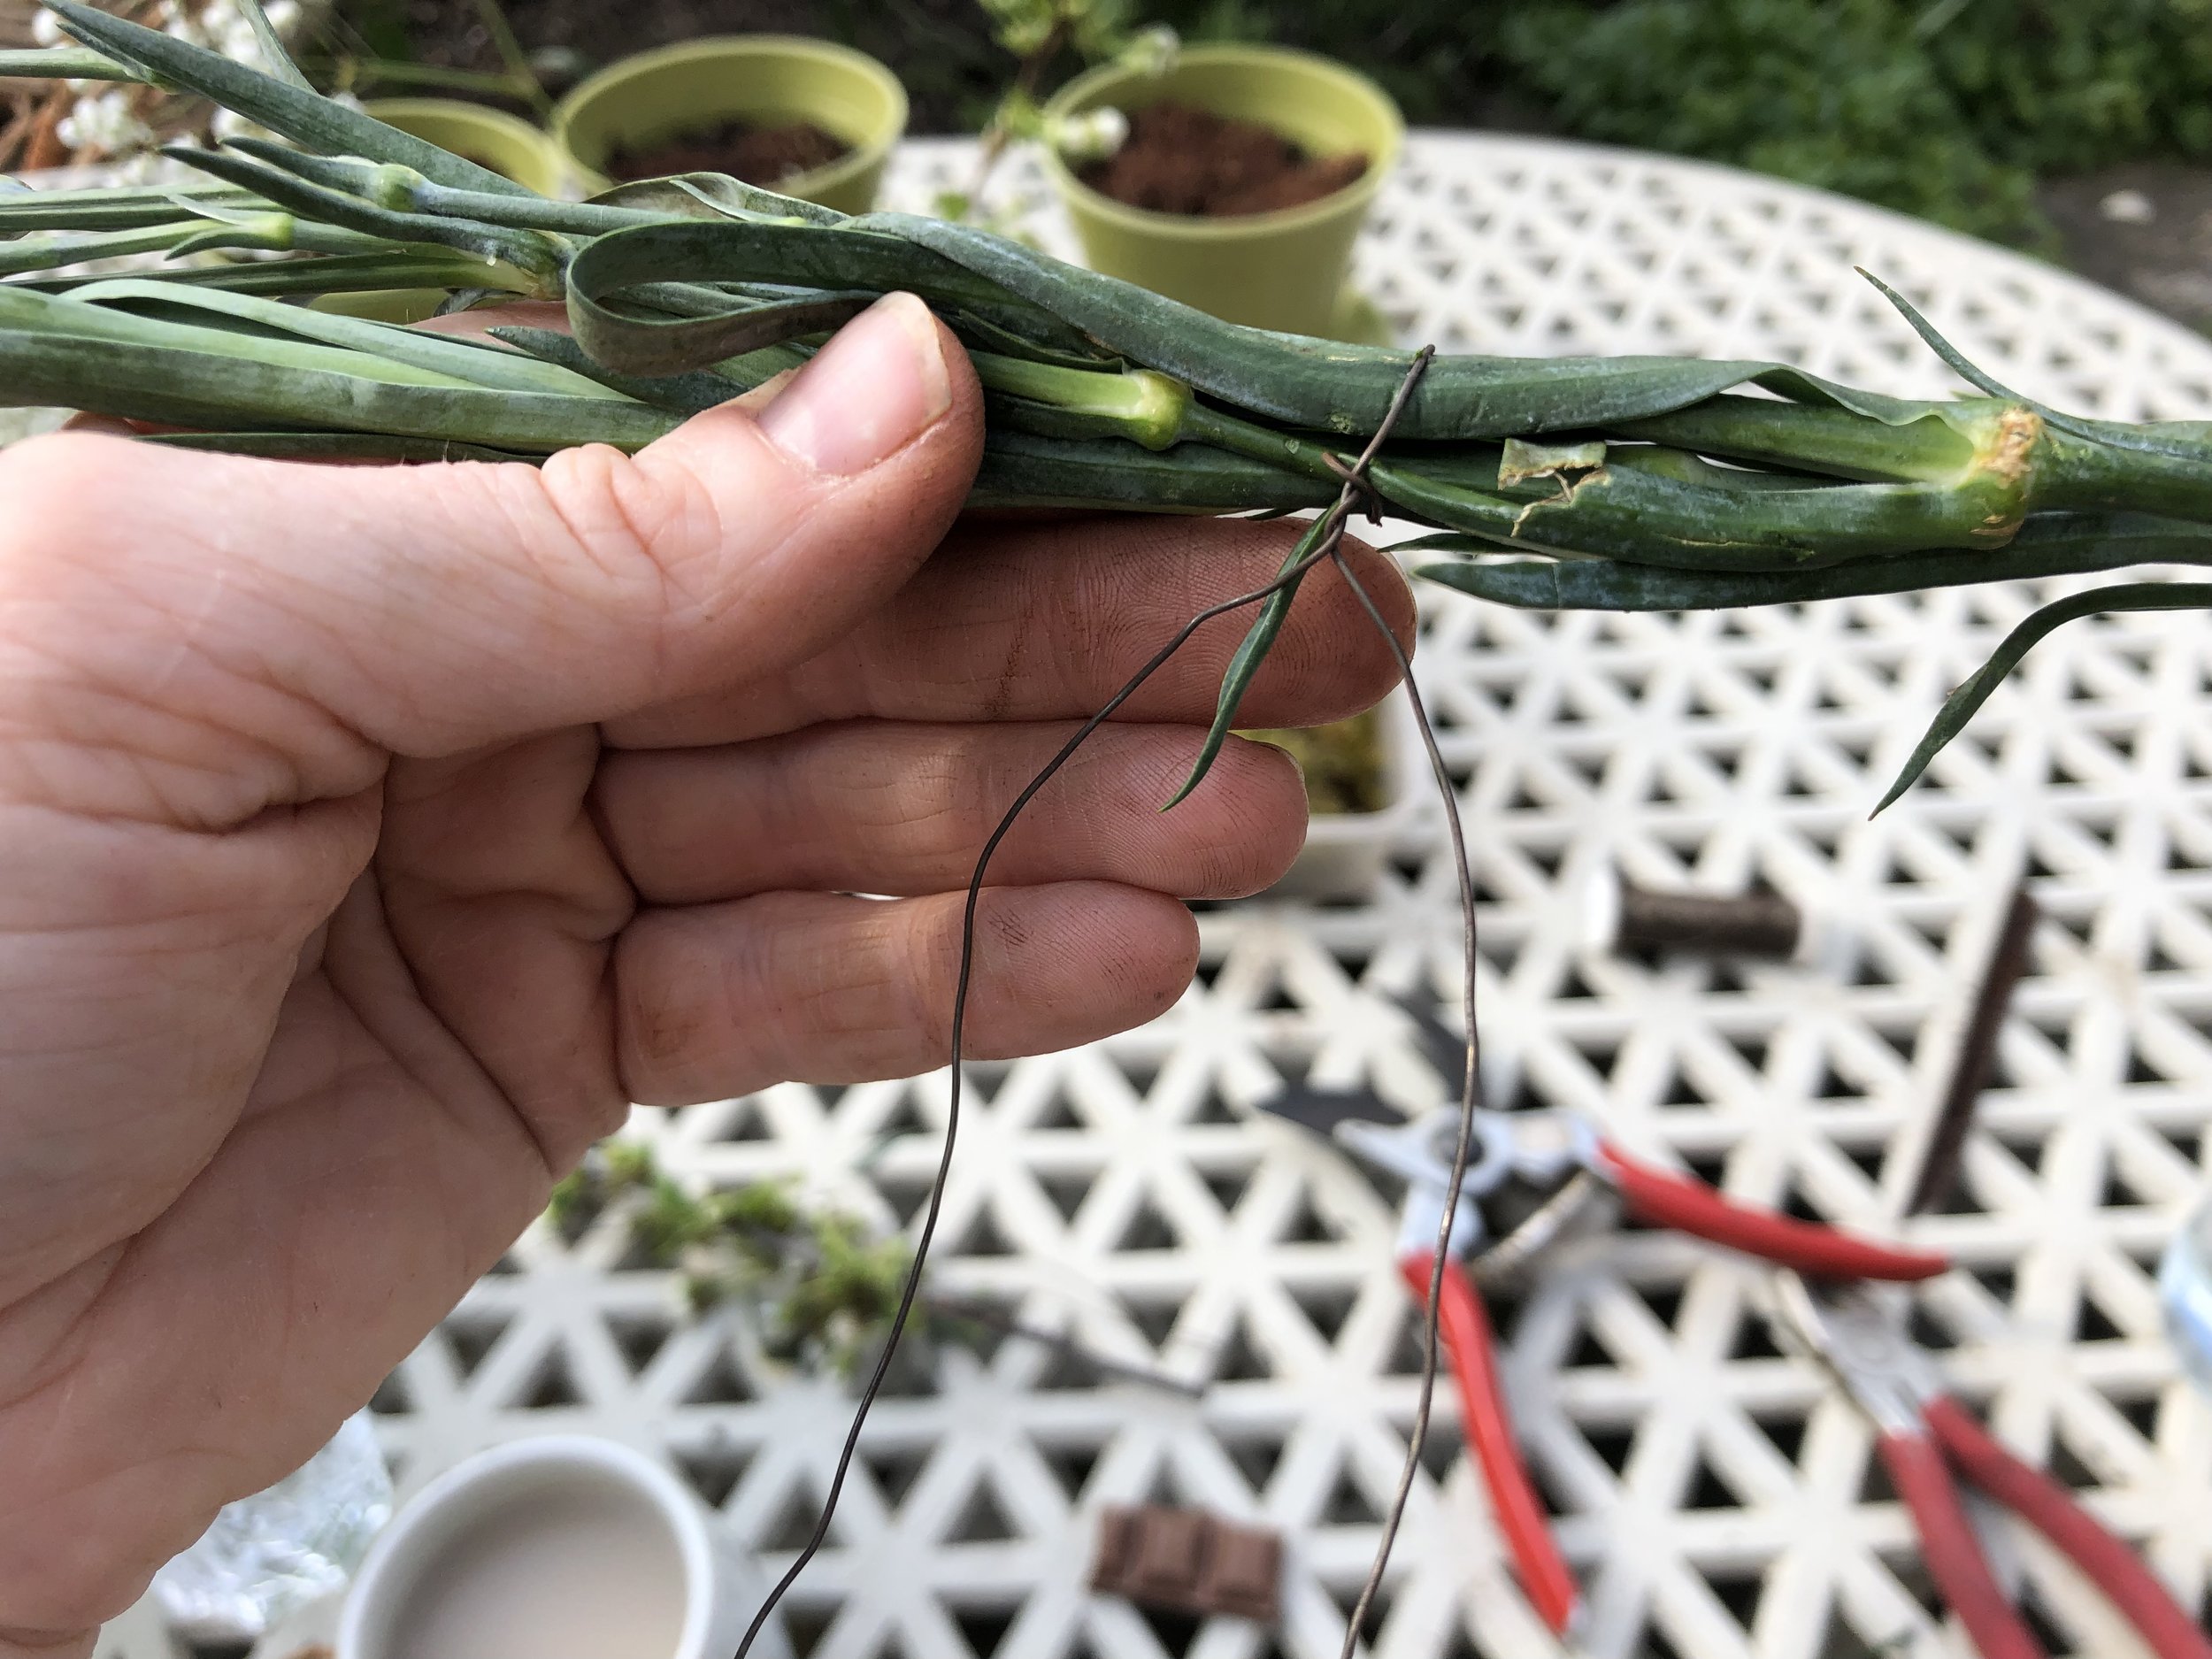
I wrapped florist wire around a piece of foliage (using the same method you used for attaching pine cones on the IGTV tutorial mentioned above) then attached the foliage to either the inside or outside of the wreath.

Attach hanging branches all the way along the wreath and the viola it’s complete!


I’ll add an image tomorrow of the wreath in situ!

To keep it as fresh as possible I’ll spritz every evening.

Hand made fabric weights


I made these cute triangular weights for my Men’s sewing workshop last week and they were so easy to use that thought I would show you how you could make your own weights on here, you do not need any specialist equipment, all you need is

  • a few fabric scraps

  • ruler

  • card template

  • needle

  • thread

  • rice

I made ten of these in less than an hour and used up loads of old bits of favorite scraps.


1st - Cut a pile of 8” x 4” rectangles and press.

2.JPG

4.JPG

2nd- Feel free to sew smaller patches together to make the 8” x 4” pieces and it adds interesting seams to your weights.


3a.JPG

3rd- Fold your rectangles RST (right sides together) and sew along two of the sides, back stitching at either ends of the stitch lines to secure the stitch. Trim some of the excess of the corners.


5.JPG

4th- Turn your squares the right way out. I use a paper presser tool to turn out my corners and get sharp corners but you can use a pencil or knitting needle.


10.JPG

5th- After pressing fill the weight pouches 2/3rd’s full with rice. Close the opening so the side seam is in the center creating a pyramid shape and secure with clips or pins.


9.JPG

6th- Hand stitch the seam shut, using really tiny stitches so the rice is safe and doesn’t escape out.


13.JPG

Ta da! You have made them!! Enjoy making your creations using your handmade weights.

If you post them on socail media don’t forget the #makewithabi

Beginners Tapestry Workshop

This week I had my first tapestry workshop in my home.

I felt so honored having these woman who paid to come through my door to learn this beautiful ancient craft of tapestry weaving.

20190623-Abigail_Wastie-Tapestry_Ex_and_Wrkshp-40.jpg

I had a selection of carefully curated woollen yarns.

Each student receives a bag containing a ready warped tapestry frame, wooden bobbin, wooden fork, two wooden shed sticks, wooden doweling a yarn needle, a copy of my ‘Beginners guide to tapestry’ and a ball of cotton warp so they can start another weaving at home.

Despite feeling nervous and suppressing any impostor syndrome emotions it was a really enjoyable afternoon doing something I love with pleasurable company.

The best bit about it was in the evening when all the students sent me photos of the weaving they had been doing that night…its addictive!

20190623-Abigail_Wastie-Tapestry_Ex_and_Wrkshp-42.jpg

Playing around with free hand embroidery

Free hand embroidery keeps popping up in my work, its so easy to do, take a little bit of time and a little bit of technical guidance but anyone could do it…even a total sewing novice!

Here are some close ups of the random stuff I have embroidered over the last year:


You may have spotted some text in those embroideries above; I’m not particularly good at expressing political opinions verbally even though I have all those feelings go on inside but using stitch has felt a small way that I show my team support…in the #handmade organic tee I have hand stitched ‘dumptrump’ inside a american flag and in my #raspberryrucksack I have hand stitched ‘society has a distorted view of beauty’ on the inside pocket, this is something I am reminding myself of a lot these days.

IMG_5266.JPG

Hand embroidery makes sweet gifts too. I used hand embroidery to make a little wall hanging for Dave one Christmas too, I designed a compass image containing his favorite quote ‘be the best in your day‘ and put all our initials inside it ‘A, A, J, D’ its just a little things but it feels special to us. Sometimes i think the act of time involved in making something gives it value alone.


IMG_7679.jpg

And everything you can see in this photo is all you need to make a embroidery; a wood embroidery hoop, embroidery threads, embroidery scissors, embroidery needles and a small scrap of fabric or garment.

Or email me to join one of my embroidery workshops which are done online over C-19 lockdown and I post all the students there own mini embroidery kit.


Here is a work in progress shot of the eye I embroidered, I did this embroidery on a long car journey using a photo of an eye off my phone.by layering up lots of back stitch to create a dense layering.

Here is a work in progress shot of the eye I embroidered, I did this embroidery on a long car journey using a photo of an eye off my phone.by layering up lots of back stitch to create a dense layering.

Here you can see the finished eye!

Here you can see the finished eye!


This is it finished- its embroidered on the Sarah Kristen Morning glory top wrap top

This is it finished- its embroidered on the Sarah Kristen Morning glory top wrap top


Here I embroidered the hem of my jeans with flames to strengthen the fraying hem.

Here I embroidered the hem of my jeans with flames to strengthen the fraying hem.


I love to keep my threads organised on these hand cut grey card bobbins. Here is a crese

I love to keep my threads organised on these hand cut grey card bobbins. Here is a crescent moon made with back stitch and the sun is made with a twin needle stitch centre and back stitch sun flames. Stitched onto a piece of organic cotton jersey that I sewed into a crew neck tee.


All you need to make a embroidery; a wood embroidery hoop, embroidery threads, embroidery scissors, embroidery needles and a small scrap of fabric or garment.

Give it a go and #sewwithabi so I can see the results!

If you would like some guidance with embroidery check out my free hand embroidery workshops here!


I am indebted to lots of lovely friends for these photos including @thegribbons, @mattjamesco and @joe.farrar